Image Map
Showing posts with label Recipes. Show all posts

Tuesday, June 26, 2012

Lemon Basil Tomato Pesto Pasta with Shrimp

Lemon Basil in the garden....

Southern Ontario is experiencing a wonderfully warm and steamy summer so far, which means that it's only June 23 and my garden looks like the 'after' picture from a Miracle Grow commercial.  This weekend I was delightfully surprised to find that my lemon basil plant already had enough leaves to make pesto....(YAY!). 

A couple of years ago, on one of my yearly trips to Florida, my aunt made this memorable Tomato Pesto Pasta with Shrimp.  You know how some dishes (for whatever reason) just stick with you (this happens to me all the time)....this pasta dish was no exception.  So I thought I'd take a crack at replicating it....and it turned out to be a TOTAL SUCCESS.

This recipe will give you left over pesto, which can stay in the fridge for a few weeks.  It has a fresh taste (from the lemon basil) and light richness (from the roasted garlic and roasted tomatoes) that would be great with baked fish, baked chicken, as a spread on a baguette (mmmm, baguette)....etc.
Mmmmmm...pasta....
Lemon Basil Tomato Pesto Pasta with Shrimp

Wednesday, March 28, 2012

Teriyaki Marinated Salmon Fillet in Phyllo Pastry

So I saw the movie 'Salmon Fishing in the Yemen' a couple of weeks ago - which was the inspiration behind me sitting down to write this post for my favourite salmon recipe.  This movie is probably one of the best romantic comedies that I've seen in a while.  It’s hilarious (which is almost entirely because of Kristen Scott Thomas) and heart-warming.  And come on....the title alone would make me want to see it....

I picked up this recipe from my Sauces and Marinades class.  There is something about wrapping the salmon teriyaki in layers of butter and phyllo pastry that makes it a-mazing (I am sure wrapping anything in layers of butter and phyllo pastry would have the same effect....I might even consider giving tofu another chance if it was wrapped in layers of butter and phyllo pastry....).  I think the phyllo pastry has the added benefit of 'fancy-ing up' (yes, 'fancy-ing' is a word) the basic salmon teriyaki recipe.  Whatever the reason, the combination is delicious.

This is an adapted version of the recipe that was taught in class.  I turned the marinade into a glaze.  I find the glaze holds better to the salmon once it's wrapped in phyllo.  Should you want to be healthy, you can skip wrapping the teriyaki glazed salmon in layers of butter and phyllo pastry and instead pan fry or grill it.   

Also, since salmon has a lot of natural flavour, make sure you use a low sodium soya sauce - otherwise you will end up with a big salty mess.

Teriyaki Marinated Salmon Fillet in Phyllo Pastry
(makes 4-6 servings)

Ingredients:

Monday, March 5, 2012

Rock Buns


My Grandmother.....
When I was younger, my grandmother often came over and spent the weekend.  This was always so exciting, because I was lucky enough to have one of those grandmothers who spoiled me with attention, cuddles & kisses.  AND when we baked together she would let me put sprinkles on everything - & when your 6, the person who lets you put sprinkles on things is the next best thing to Santa Claus. 

One of the earliest memories I have in the kitchen is baking Rock Buns with my grandmother.  Rock buns are an excellent breakfast/snack foods.  Think muffins without the bottom (I only eat the tops of muffins...unless it is an amazing muffin - like a chocolate chip muffin - only then I might consider eating the bottom).  Rock buns are super easy to make.  They take maybe 15 minutes to mix, and 25-30 minutes to bake.  And you can put pretty much anything in the rock buns to make different variations - shredded coconut, cranberries, chocolate chips...the options are endless!

It was my grandmothers 87th birthday last weekend.  Like many 87 year old, her short-term memory is not too good, and she sometimes has a vacant look in her eyes.  It's the unfortunate signs of Alzheimer’s setting in. 

Her story is not unlike many woman with a South Asian background from her generation - Arranged marriage at 13, had her first child (of nine) at 15, complete with relocating to a new country at 50 & then losing her husband of 40 years (my grandfather - who I never had the pleasure of knowing) to lung cancer.  What makes her story unique, and why I still see her as the superhero from my childhood days, is when her husband passed away she pushed on, put her existing skills to use and embarked on a her first  career (outside of the home) as a seamstress.  Also, once she retired she discovered a hidden talent for art at 65, creating some of the most wonderful paintings that I am proud to have on my walls. 

I know that there may not be too many years left, and those that are will not be easy as her memories slip farther away.  But I will always be grateful for my memories, the cuddles & kisses and the Rock Buns.

Rock Buns
(makes about 24)

Thursday, March 1, 2012

Red Velvet Cake


I have been having love affair with Red Velvet Cake for about 5 years now.  I discovered the wonderful that is the red velvet cake when I was visiting family in Florida.  And now, I love anything red velvet (except for this red velvet latte I tried last Christmas...lets just say that my taste buds were offended by it...).   There is something so deliciously perfect about the combination of red velvet cake and cream cheese icing.  It's not often that we find red velvet cakes in the supermarket or bakeries here in Canada (it's just not as popular here as it is in the USA) so I have been on a mission to spread the 'Red Velvet Word' ever since.

After discovering red velvet, I also set out on a quest to find the perfect red velvet cake recipe.  There were so many out there that I had a problem finding one that was (1) A rich deep red colour - not brown-ish red (2) Had a hint of cocoa that was not overwhelming (3) Perfectly moist, because really, who likes a dry cake?!?  I used a recipe I found here and here as a base and adapted it to my liking. 

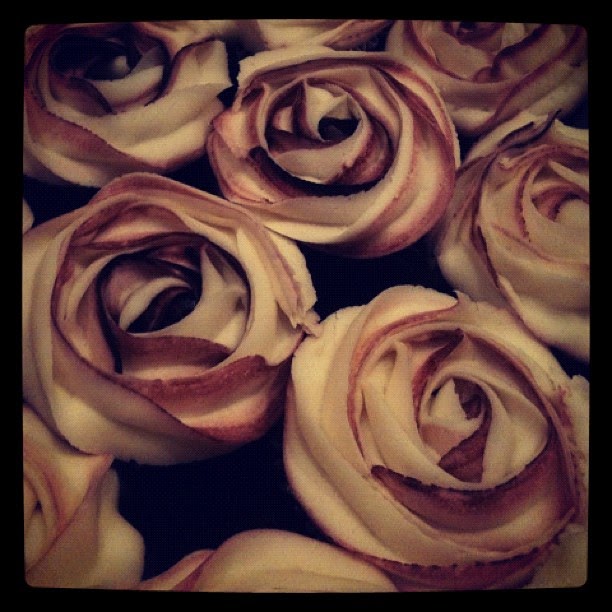
So, I am not a cake decorator (can't be good at everything).  I took a cake decorating class with my best friend a couple of years ago and I failed miserably.  I have always had a *very slight* tremor in my hand.  It's not noticeable, but has meant that I would never have had a career as a surgeon...and apparently also meant I would never be able to write well with icing on a cake - the instructor couldn't understand why my 'Happy Birthday' looked like a font out of a 1950's horror movie.  But one day I stumbled across this rosette icing technique on 'I am Baker'.  I found it super easy and not incredibly time consuming.  I love the look of the rosettes clustered on cakes and cupcakes.  I used a 2D tip instead of the suggested 1M (because that's what I had from the cake decorating class) and it worked fine. 

These are not roses...they are cupcakes!!!
(I have only made this cake using a scale to measure out the ingredients.  The next time I make it, I will convert the measurements to cups and update... )

Red Velvet Cake
Makes 2 9"cakes or 24 cupcakes

Friday, February 24, 2012

Bacon Tomato Lentil Pasta

These lentils look so pretty!
 Things I love about this recipe:
(1)   It’s got bacon (and no….I do not have a bacon addiction ….I’ve been tested...)
(2)    I love the bitter flavor of arugula
(3)    The lentils make the pasta seem creamy without actually adding any cream (healthy-ish, right?)
a.     I've also heard that lentils are good for you (wikipedia knows everything!)
(4)   The ingredient list is pretty simple...
a.     Whenever a recipe calls for 'pasta', I try to use brown rice pasta (as a general rule, I 'try' to 'healthify' the rest of my diet in an effort to balance out the amount of bacon that I consume....)
b.     If arugula isn't your cup of tea, you can supplement with flat leaf parsley (...now, I am not trying to tell you what to do here, but I would really 'recommend' giving arugula another try... )

I adapted this recipe from one I found in a Martha Stewart magazine a million years ago.  It's a good hearty winter pasta and makes for good leftovers. 

(Although I don't always do this....even though I should) I recommend reading the directions in its entirety prior to starting the recipe.  In order to minimize the cooking time,  you can caramelize (- this is possibly the most overused word in my Dad's vocabulary....he'll be excited that it made an appearance on my blog...) the onions and boil the lentils at the same time.

Bacon Tomato Lentil Pasta
(Makes 4-6 servings as a main course)

Tuesday, February 21, 2012

Bacon Caramel Popcorn


I still have bacon left over in the freezer from the Butchery and Charcuterie class that I took last November/December. 

My lovely aunt (the same one who organizes our yearly cookie exchange) sent me this recipe a couple of weeks ago as she knows I have a particular affinity for anything with bacon in it....

I love caramel popcorn.  (and I'm sure I am not the only person that finds it addictive.)

So - because of all of these things, I felt like the stars were aligning for me to make this recipe. 

Bacon Caramel Popcorn 
Adapted from Edible Canada.
(Approx. 10 servings)

Wednesday, February 15, 2012

Sprinkle Spiral Cookies


I stumbled upon these delightful cookies when I was looking for a recipe on how to make Battenburg cake (which is quite possibly my most favourite dessert recipe ever....) (well, maybe not ever, but definitely top 5...).  (Back to the cookies...) There was something about the sprinkles and colours in this cookie that immediately brought a smile to my face. 

A few months ago, one of my very good friends lost her mother to cancer.  In an effort to cheer her up and bring a bit of sunshine into her world, I made these cookies, hoping that they might have the same effect that they did on me - I am of the opinion that sprinkles make everything just a little bit better. 

The recipe and directions were flawless (I found these at Sprinkle Bakes - this girl really is a baked-goods genius), but it did take me a couple of trials to get them right.  I am pretty sure this had to do with my fridge temperature and my mixer (I don't have a food processor as the recipe recommends - so I had to make do with the electric mixer).  Despite the numerous failures, I learned from my mistakes, persevered - and four batches of colourful cookie dough in the green bin later - success!
 
I'll share my 'lessons learned' in an effort to make future attempts by any other willing bakers just a little easier...

Colourful Spiral Cookies
(Adapted from Sprinkle Bakes)
(Makes about 3 dozen)

Monday, February 6, 2012

Sweet Potato Gnocchi


I have never met a sweet potato that I didn't like.  The subtle sweet and starchy qualities make it one of my go-to vegetables.  
(And I've heard that they are pretty healthy too...).
My love of sweet potatoes is what inspired this recipe.  When making potato gnocchi I thought...why not try this with sweet potato? 
What I learned through the process is that (1) Sweet potatoes are not as starchy and have more moisture then regular potatoes.  Therefore, more flour was required in order to get the ‘dumpling effect’.  (2) It's important to make sure that the sweet potatoes are boiled through.  They are more fibrous then regular potatoes...if they are not fully cooked, ricing them can be more difficult. 

I made two different sauces to go with the sweet potato Gnocchi....A simple cinnamon and butter sauce - melt about 1/4 cup of butter in a sauce pan and add two cinnamon sticks and let simmer for 5-10 minutes. 
(and because of my insatiable sweet tooth) I wanted to try a candied sweet potato gnocchi as well, so I made a similar sauce to the above - melt about 1/4 cup of butter in a sauce pan, add 2 tsp ground cinnamon, add 1/4 cup brown sugar and let simmer on medium to low for 10-15 minutes.  I put these sauces on to simmer prior to boiling the gnocchi so they could be sauced as soon as they were done. 

The directions are similar to the those from the potato gnocchi.  You will need a ricer to mash the sweet potatoes in order to achieve the desired texture while avoiding the ‘compacting-effect’ that mashing by hand gives the potatoes. 

Sweet Potato Gnocchi
(makes about 10-12 servings)

Tuesday, January 31, 2012

Gnocchi

Gnocchi are like little potato pillows.  Once they are made and frozen, they make for an easy week night dinner as they can be boiled right from the freezer, so there is no thawing time required.  They taste great with anything from a simple tomato sauce to pesto to even melted butter and parmesan cheese. 

This is great Italian comfort food, especially on a cold snowy day when carbs are a necessity.


A ricer (pictured above) makes the Gnocchi process a lot easier as you'll be able to achieve the fine mashed texture required for the potatoes in this recipe with very little effort. 

Gnocchi
(10-12 servings)

Thursday, January 26, 2012

The Biscotti Series.....(Part 2)

The great thing about biscotti is that you really can add anything to them (I've seen some great Cranberry & White Chocolate versions) once you understand a basic biscotti recipe.  However you'll want to be careful with any sort of chunky ingredient, as they can cause crumbling when attempting to cut the biscotti loaf into biscuits (for example, finely chopping the nuts before adding them to the batter will make slicing the biscotti loaf into biscuits much easier...).

The 'zester' makes zesting citrus fruit easy....otherwise a grater or a peeler & fine dice will work...
Pistachio-Orange Biscotti
(makes about 36 cookies)

Tuesday, January 24, 2012

The Biscotti Series....(Part 1)

Biscotti + Coffee = (makes me) happy.   It's very simple. 

And because of my simple equation, I was very excited to learn how to make Biscotti in my Northern Italian Cuisine class. 

The keys to making biscotti (the ones that I've found useful)...
-In the summer, flour tends to be more moist, so you might have to use more
-In the winter, flour tends to be more dry, so you might have to use less
-If you live in a humid climate you might need more flour
-if you live in a dry climate you might need less flour
-You might also want to see how the stars are aligning on the day you are going to make Biscotti...

I generally start off with the amount of flour the recipe states.  If the dough is too moist once all the ingredients are incorporated (and most of the time my biscotti dough is too moist, because the humidity in Toronto is higher) I'll incorporate a 1/4 cup of flour until I get the right texture.  What you are looking for in the batter is the consistency of sticky cookie dough.  

If you are unsure when it comes to baking 'doneness', it's always better to under-bake biscotti then over-bake...for two reasons:  First, the cookie will harden as it cools and second, (once it has cooled a little after the second baking) if the biscotti is not as hard as you would like it to be, you can always put it back into the oven for another 10-15 minutes.

I have two recipes for biscotti that I love => Toasted Almond & Chocolate and Pistachio & Orange 

Chocolate and Toasted Almond Biscotti
(makes about 36 cookies)

Monday, January 16, 2012

The Delightful Tiramisu

Tiramisu (for those who don't know) is an Italian trifle made with Savoiardi (lady finger biscuits) soaked in coffee and liquor, layered with a heavenly rich, but light custard.
As a general rule, I do not like trifle.  Apparently this is not the case when it's Italian trifle.  It must be the combination of the lady finger biscuits and liquor, and of course the decadence of the Mascarpone cheese. 


This recipe was adapted from the one that is in the George Brown College Northern Italian Cuisine manual.

You’re going to need a few mixing bowls for this - one for the egg whites, one for combining the egg yolks and sugar and one for the mascarpone cheese. 
I like to do the mixing by hand.  It does require some arm and shoulder stamina, but I prefer the control that you get when mixing by hand..I find that it helps with determining the right consistency for each step (and it has the added benefit of burning off some calories, which you are guaranteed to consume when you eat this dessert). 

A couple of my Tiramisu tips:
-Take the eggs out of the fridge a couple of hours before you want to make this....they need to be room temperature
-This dessert requires some planning as it does have to be refrigerated overnight
-This version of Tiramisu does contain raw eggs...if you would rather the eggs be cooked, please see the modification at the bottom of this post

Tiramisu

Ingredients:
450 g (1 tub) mascarpone cheese
6 eggs
6 tsbp sugar
1 pkg Savoiardi (lady fingers biscuits)
6 oz Kahlua (or other coffee liquor)
3/4 cup espresso coffee
1 vanilla bean
Cocoa powder (for dusting)

Directions:
(1) Have a pan (about 12" x 10" x 2.5" deep) ready for assembling the Tiramisu (I used a foil pan...)
(2) Empty mascarpone Cheese into a mixing bowl;  Mix vigorously by hand with a spatula until mascarpone is smooth (like spreadable cream cheese); Set aside
Mascarpone
(3) Combine espresso and Kahlua together in a bowl (wide enough to dip the length of the biscuits in); set aside
(4) Separate the eggs, placing the egg whites into one mixing bowl and the eggs yokes into another
(5) Whisk the egg yolks with the sugar until thick and pale

Egg Yolks and Sugar
(6) Slice vanilla bean down the center and scrap insides of vanilla bean out with the back of a knife; mix into egg yolk mixture until just combined
***placing the husk of the vanilla bean into a jar of white sugar infuses the sugar with a lovely vanilla flavour/scent which can then be used for baking, sweetening coffee etc...
(7) Whip the egg whites until they double in volume and form stiff peaks
Tips for whisking egg whites:
-make sure the egg whites are at room temperature
-use a dry, clean bowl
-make sure whisk is very clean
-whip with a loose shoulder and wrist
-sometimes it helps to put the bowl at an angle.

Egg Whites

(8) Combine egg yolk mixture with the mascarpone cheese a little at a time until just blended
(9) Fold the egg whites into the egg yolk/Mascarpone mixture a little at a time until just incorporated
***don't over mix*** (it's okay if it's a little lumpy)

Egg Yolk/Mascarpone/Egg White mixture...
Assembly:
(1) Dip the cookies in the espresso/Kahlua mixture
-Don't soak them...Quickly dip each side of biscuit in the liquid mixture and then flick off excess liquid.
(2) Layer the biscuits into the pan, covering the entire bottom of the pan (cutting the cookies as required to cover the entire bottom of pan)
(3) Spread about 1/2 of the custard mixture over the biscuits
***At this point, drop the pan from about 2 inches in the air, 2-3 times to release any air bubbles
(4) Dip and cover the custard layer with a second layer of biscuits.  Position the cookies the opposite way of the first layer (i.e. If you placed the first layer horizontally, then position second layer of biscuits vertically)

Second layer of biscuits over first layer of custard
(5) Spread the remainder of the Custard over the second layer of cookies
***Again, Drop the pan from about 2 inches in the air 2-3 times to release any air bubbles
(6) Refrigerate overnight. 
(7) Before serving, sprinkle with cocoa power

I was sending this one to my Aunt's house...but of course I had to try it first to make sure it was okay.....
*** if raw eggs freak you out ***
-Step 3 - whisk egg yolks and sugar over a pot of boiling water until they turn pale, but use 8 egg yolks instead of 6 (you must whisk continuously, otherwise you'll end up with scrambled eggs)
-Step 4 - replace the egg whites with 300-350 ml of 35% whipping cream and whip until stiff.  Replace egg whites with whipped cream in step 6 above and gently fold into the egg yolk/mascarpone mixture

Happy Cooking!

Thursday, January 5, 2012

An Adventure in Shortbread Part 2 (Part 5 of 'Christmas Cookies')

The second of the two kinds of shortbread that I make is the type that melts in your mouth...it's light and it's airy. 
I have been using this recipe for years (It was my very first shortbread recipe!).  I am not sure where it originally came from (sometime in the late 1980's, my sister put together a MacWrite-v.4.5, 3-ringed binder recipe book (including hand-drawn pictures by yours truly) (she was probably somewhere around the age of 10 so I would have been 5 years old...) for my Mom & Dad's wedding anniversary...this is where I found it).

This is a good shortbread dough to use with a cookie press.  Personally I am not a huge fan of the cookie press, mainly because I find that once the cookies are baked, they are almost too delicate and crumbly.  So a few years ago, I started using a piping bag to shape these cookies. Although it required a lot of arm strength to pipe them out, I ended up being extremely happy with the results.  They are much more sturdy and can stand up to being packaged with other cookies.  I used a number 1M Wilton tip on a regular piping bag, and piped them into mini rosette shapes. 


Whipped Shortbread
(makes about 60 cookies)

1 lb(500 g) of butter, at room temperature
1 cup sifted icing sugar
1/2 cup corn starch
2 tsp vanilla
3 cups all purpose flour

(1) Preheat oven to 325 degrees
(2) Line baking sheet(s) with parchment paper
(3) With an electric mixer on medium speed, cream butter and icing sugar until very fluffy (this is what gives the cookie that light and airy texture...it takes about 5 minutes)
(4) Mix in corn starch and vanilla until combined
(5) Turn electric mixer to low and mix in flour 
(6) Turn electric mixer back to medium speed and continue to mix until dough has that light and fluffy texture (about 3-4 minutes)
(7) (time to get the cookies onto your baking sheets) Drop by teaspoonfuls or use a cookie press or pipe cookies onto the parchment lined baking sheets.  (I usually do this in a couple of batches as I don't have enough baking sheets or oven space to bake these all at once.  If you find your kitchen getting too warm in between batches, pop the shortbread dough into the fridge so it doesn't melt prior to baking)
(8) Once they are shaped, before putting them in the oven, its time to have some festive fun with cookie decorations...I used red and green M&M's and different coloured sugars. 
(9) Bake 20-25 minutes, until edges are a golden brown


We made it!  All 5 Christmas 2011 National Day of Baking recipes have been posted.  I hope you enjoyed reading them as much as I enjoyed writing about them. 

I know I am a few days late, but Happy New Year!  I wish you all the best things for 2012.  And, as always...

Happy Cooking!

Tuesday, January 3, 2012

An Adventure in Shortbread Part 1...(Part 4 of 'Christmas Cookies'...)


The thing with Shortbread is that my mom likes the buttery 'Walkers'-like Scottish version (the one that comes in the Tartan packaging...), and everyone else likes the light and airy, melt-in-your-mouth Whipped version.  So, in order to spread the Christmas joy to all those around me.....I make both.  I am fairly certain this is how I go through so many pounds of butter in December....

Basic Shortbread (the one that my Mom likes...)

I've been using a recipe for shortbread, which was ripped out of an old Martha Stewart magazine, for years now.  It's a very basic shortbread recipe (hence the name of the recipe), which isn't too sweet.

I try not to fancy it up, which means no icing, sprinkles, nonpareils etc, because it's pretty good as is and it's a nice departure from the super sweet decorated treats which are available in abundance at this time of year (don't get me wrong, I love those too...I do sometimes wonder how the silver nonpareil's end up 'silver'....one of life's mysteries I guess...).  This is the kind of shortbread that is good for dunking in a hot cup of tea...

The other good thing about this cookie is that it lasts for about a month in an airtight container...and tastes even better about a week after it has been baked. 

Basic Shortbread
(makes about 36 cookies – depending on how big you want the cookie to be)

Ingredients:
1 1/3 cups unsalted butter, room temperature, (plus more for pans)
2/3 cup sugar
3/4 teaspoon salt
2 tsp vanilla
1/2 tsp almond extract
3 1/3 cups all-purpose flour 

Directions:
(1) Preheat oven to 275 degrees
(2) Butter a 9 x 10 x 1 inch baking pan (it's okay if it's a little bigger)
(3) In a large bowl, with an electric mixer on medium, cream butter and sugar until light and fluffy 
(4) Add salt, vanilla and almond extract, mix to combine
(5) Turn the mixer speed to low and add flour, 1 cup at a time, until just combined
(6) Press dough into prepared pan (1/2" thick) leveling and smoothing the top (I use the side of a tall water glass as a mini rolling pin to smooth out the top)
(7) (this step makes cutting them easier once they have finished baking) using a dough scraper or a dull knife (you don't want to scratch the bottom of you baking pans) cut dough lengthwise into about 9 strips (or however wide you want the cookie to be)  cut the strips crosswise into 36 bars about 3 inches wide (or however long you want the cookie to be) 
(8) Using a fork, poke a creative decoration into the surface of the unbaked cookie
(9) Bake shortbread until they are a light gold colour (but not browned) - this can take 75-85 minutes, so be patient
(10) Once finished baking, remove pan from oven, let cool slightly on a wire rack.  Once it's cooled slightly, go over cuts that were made prior to baking with a dull knife
(11) Let cool complete, remove from pan
(12) Can be stored in an airtight container for up to a month 


Warning, these are very addictive....

Up next….Part 5 of 5 of the 2011’s Christmas cookie extravaganza!  Whipped Shortbread….

Thursday, December 29, 2011

Cookies 'n' Cream Hershey's Kiss Cookies (Part 3 of Christmas Cookies...)

A continuation of my love affair with Hershey's Kisses.....


When I discovered Candy Cane Hershey's Kisses in the grocery store, you can imagine how excited I was to find, sitting in the next display, Cookies 'n' Cream Hershey's Kisses (yay!).  They were begging to be bought and used...who was I to say 'no'?

I used a similar recipe as with the Candy Cane Hershey's Kiss Chocolate cookies...however instead of using peppermint extract, I finely chopped up some Oreo's, in order to tie the flavour of the Cookies 'n' Cream Hershey's Kiss into the cookie batter. 

And as I did with the Pumpkin Spiced Hershey's Kiss cookies and the Candy Cane Hershey's Kiss Chocolate Cookies, I baked these cookies in a mini muffin pan so they would retain a better shape when the Cookies 'n' Cream Hershey's Kiss was placed in the middle.

Here's the recipe....

Cookies 'n' Cream Hershey's Kiss Chocolate Cookies
(Makes 5-6 dozen cookies)

Ingredients:
1 1/4 cup  unsalted butter, softened
2 cups sugar
2 eggs
2 tsp vanilla
2 cups flour
3/4 cup cocoa
1 tsp baking soda
1/2 tsp salt
5-10 Oreo Cookies, finely chopped
1 bag Cookies 'n' Cream Hershey's Kisses, unwrapped

Directions:
(1) Place unwrapped Cookies 'n' Cream Hershey's Kisses in freezer (this ensures that they retain their 'Hershey's Kiss shape')
(2) Preheat oven to 350 degrees
(3) In a medium bowl, whisk together flour, cocoa, baking soda and salt; set aside
(4) With an electric mixer, on medium speed, cream together butter, sugar, eggs and vanilla until lightened in colour
(5) Reduce speed to low and gradually mix in dry ingredients until thoroughly combined
(6) Fold finely chopped Oreo's into batter
(7) (this is where it gets a little messy) Using two spoons, drop approx. 1/2 tablespoon of dough into a non-stick mini muffin pan (I do one mini muffin pan at a time, but if you have more then one pan, feel free to do more)
(8) Bake for 12-15 minutes (do not over-bake, otherwise cookies won't be chewy)
(9) Take Hershey's Kisses out of freezer; Remove baking pan from oven, immediately press Hershey's Kiss in middle of cookie
(10) Cool 10 minutes on baking pan; transfer to racks to cool completely.


I can't wait to continue with my discovery of new types of Hershey's Kisses.  I hear that there is a Hershey's Kiss filled with Cherry Cordial Creme...!

Happy Cooking!