Image Map

Wednesday, March 28, 2012

Teriyaki Marinated Salmon Fillet in Phyllo Pastry

So I saw the movie 'Salmon Fishing in the Yemen' a couple of weeks ago - which was the inspiration behind me sitting down to write this post for my favourite salmon recipe.  This movie is probably one of the best romantic comedies that I've seen in a while.  It’s hilarious (which is almost entirely because of Kristen Scott Thomas) and heart-warming.  And come on....the title alone would make me want to see it....

I picked up this recipe from my Sauces and Marinades class.  There is something about wrapping the salmon teriyaki in layers of butter and phyllo pastry that makes it a-mazing (I am sure wrapping anything in layers of butter and phyllo pastry would have the same effect....I might even consider giving tofu another chance if it was wrapped in layers of butter and phyllo pastry....).  I think the phyllo pastry has the added benefit of 'fancy-ing up' (yes, 'fancy-ing' is a word) the basic salmon teriyaki recipe.  Whatever the reason, the combination is delicious.

This is an adapted version of the recipe that was taught in class.  I turned the marinade into a glaze.  I find the glaze holds better to the salmon once it's wrapped in phyllo.  Should you want to be healthy, you can skip wrapping the teriyaki glazed salmon in layers of butter and phyllo pastry and instead pan fry or grill it.   

Also, since salmon has a lot of natural flavour, make sure you use a low sodium soya sauce - otherwise you will end up with a big salty mess.

Teriyaki Marinated Salmon Fillet in Phyllo Pastry
(makes 4-6 servings)

Ingredients:

Monday, March 12, 2012

Sauces and Marinades

Sauces and Marinades is a 6 week course offered at George Brown College through their Continuing Education program.  The main focus of this course is marinating different types of meats and fish, and then either creating a sauce out of that marinade, or pairing the dish with an accompanying sauce. 

The instructor for this course was fantastic.  She taught us to analyze and dissect each recipe in order to really question and understand why each step was included - which helped to further my quest to be able to 'cook without a recipe'. 

Week 1: Mmmmm...Carbs....
First class.  This was a demo-only class.  The instructor provided an introduction to the properties of sauces and marinades and the flexibility that these provide a cook in the kitchen. 
Demonstrated in this class were sauces specifically for pasta.  All of the sauces tasted awesome (It's not too surprising that I found all of these recipes amazing...I do love me some carbs...).  There was a Three Green Pasta with Scallops and Pesto Sauce - this pasta had peas, pesto (making pesto was part of the demo as well) and asparagus (hence - three green) and a healthy dose of whipping cream.  When I've made this at home, I replaced the whipping cream with skim evaporated milk and it actually tasted great.  There was a Spagettini Col Sugo Di Erbe E Pomodoro Crudo, which was a lovely basil/sage/rosemary/mint tomato sauce.  It tasted amazing with olive oil and parmesan cheese (I never would have thought to put mint into a tomato sauce...).  There was a Pasta with Sun Dried Tomato in Cream Sauce.   I loved the flavours of the red pepper and sun dried tomato.  There was also a Pasta with Cream Wild Mushroom Sauce.  This sauce had dried wild mushrooms (which were rehydrated), white wine, shallots and (you guessed it) whipping cream.  Rich, but very good.  And lastly, Linguine with Clams in a Spicy Pernod Sauce.  This recipe had fennel which I had not worked with too much before this class, so that was interesting.  Pernod (for those who don't know) is a French liquor (tastes like Anise).  Also, this was my first experience with cooking clams.  So that was it for the first class.  I found these to be very easy, not time-consuming recipes that would work for a weeknight dinner. 

Monday, March 5, 2012

Rock Buns


My Grandmother.....
When I was younger, my grandmother often came over and spent the weekend.  This was always so exciting, because I was lucky enough to have one of those grandmothers who spoiled me with attention, cuddles & kisses.  AND when we baked together she would let me put sprinkles on everything - & when your 6, the person who lets you put sprinkles on things is the next best thing to Santa Claus. 

One of the earliest memories I have in the kitchen is baking Rock Buns with my grandmother.  Rock buns are an excellent breakfast/snack foods.  Think muffins without the bottom (I only eat the tops of muffins...unless it is an amazing muffin - like a chocolate chip muffin - only then I might consider eating the bottom).  Rock buns are super easy to make.  They take maybe 15 minutes to mix, and 25-30 minutes to bake.  And you can put pretty much anything in the rock buns to make different variations - shredded coconut, cranberries, chocolate chips...the options are endless!

It was my grandmothers 87th birthday last weekend.  Like many 87 year old, her short-term memory is not too good, and she sometimes has a vacant look in her eyes.  It's the unfortunate signs of Alzheimer’s setting in. 

Her story is not unlike many woman with a South Asian background from her generation - Arranged marriage at 13, had her first child (of nine) at 15, complete with relocating to a new country at 50 & then losing her husband of 40 years (my grandfather - who I never had the pleasure of knowing) to lung cancer.  What makes her story unique, and why I still see her as the superhero from my childhood days, is when her husband passed away she pushed on, put her existing skills to use and embarked on a her first  career (outside of the home) as a seamstress.  Also, once she retired she discovered a hidden talent for art at 65, creating some of the most wonderful paintings that I am proud to have on my walls. 

I know that there may not be too many years left, and those that are will not be easy as her memories slip farther away.  But I will always be grateful for my memories, the cuddles & kisses and the Rock Buns.

Rock Buns
(makes about 24)

Thursday, March 1, 2012

Red Velvet Cake


I have been having love affair with Red Velvet Cake for about 5 years now.  I discovered the wonderful that is the red velvet cake when I was visiting family in Florida.  And now, I love anything red velvet (except for this red velvet latte I tried last Christmas...lets just say that my taste buds were offended by it...).   There is something so deliciously perfect about the combination of red velvet cake and cream cheese icing.  It's not often that we find red velvet cakes in the supermarket or bakeries here in Canada (it's just not as popular here as it is in the USA) so I have been on a mission to spread the 'Red Velvet Word' ever since.

After discovering red velvet, I also set out on a quest to find the perfect red velvet cake recipe.  There were so many out there that I had a problem finding one that was (1) A rich deep red colour - not brown-ish red (2) Had a hint of cocoa that was not overwhelming (3) Perfectly moist, because really, who likes a dry cake?!?  I used a recipe I found here and here as a base and adapted it to my liking. 

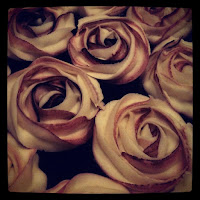
So, I am not a cake decorator (can't be good at everything).  I took a cake decorating class with my best friend a couple of years ago and I failed miserably.  I have always had a *very slight* tremor in my hand.  It's not noticeable, but has meant that I would never have had a career as a surgeon...and apparently also meant I would never be able to write well with icing on a cake - the instructor couldn't understand why my 'Happy Birthday' looked like a font out of a 1950's horror movie.  But one day I stumbled across this rosette icing technique on 'I am Baker'.  I found it super easy and not incredibly time consuming.  I love the look of the rosettes clustered on cakes and cupcakes.  I used a 2D tip instead of the suggested 1M (because that's what I had from the cake decorating class) and it worked fine. 

These are not roses...they are cupcakes!!!
(I have only made this cake using a scale to measure out the ingredients.  The next time I make it, I will convert the measurements to cups and update... )

Red Velvet Cake
Makes 2 9"cakes or 24 cupcakes